About Me

My photo
Most of you know that I came from a big family ~ 7 kids! No, we are not Catholic. Yes, we had the same parents. (Those are usually the two questions people ask when they hear "7 kids?".) Most of you also know that my mom was sick for years. I am the second oldest, so I did a lot of the care-taking of the younger kids. I learned to cook when I was 10. I remember the first thing I cooked with my dad was Tacos. I loved cooking. Then, there was the baking. I made all the desserts and the b-day cakes for everyone's b-day, including mine. And I loved it! Another thing I remember is my grandmother making the biggest dessert spreads ever at the holidays. She made sure that every person there (we are talking, like, 30+ people) had their favorite dessert. I remember visiting her when I was 20. We cooked & baked all week. I never felt as close to her until then. We had this bond now - baking! I learned so much from her. I think it fueled my love of baking ~ and cooking! Now, at the Holidays, I make sure to prepare everyone's favorite dessert, no matter how many attend. It just wouldn't be the Holiday's if you didn't have your favorite pie, cake, cookie or candies!!

Sunday, November 20, 2011

Caramelized Onion & Feta Tart

My sister, Sarah, had a little get-together several months ago and her friend Kathy brought a tart very similar to this one.  I asked for the recipe because it was soooo good, but she couldn't remember where she got it, so we googled it.  I made it last Sunday and served for a baby shower for my neighbor, Sarah Day.  It was good, but my sister and I talked about how to make it a little more savory. (The recipe called for Fontina cheese and sliced apples, and I felt that it was a little bland - though everyone seems to enjoy it).  Sarah and I love Feta, so I came up with a new recipe.  Enjoy - it's super yummy!!


Ingredients:
  • 3 tbls butter
  • 2 medium sweet onions, thinly sliced
  • pinch of salt
  • 1 tart apple, peeled, cored & thinly sliced (about 16 to 18 pieces)
  • 1 small potato, peeled and thinly sliced (about 16 to 18 pieces)
  • 1 sheet frozen puff pastry (defrost just before use)
  • small handful of flour
  • about 1 oz olive oil
  • 4 oz Feta, crumbled
  • 2 oz Parmesan cheese, shredded
Directions:
  1.  Melt 2 oz butter in a large skillet.
  2. Add sliced onions and caramelize, about 15 minutes, then set aside to cool
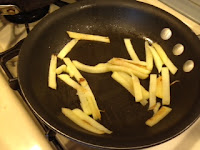
  3. In separate skillet, melt small amount of butter and place the thin potato slices down to saute.  Turn over about half way (10 to 15 minutes total time).
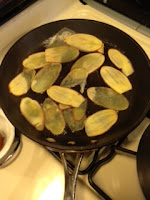
  4. In 3rd skillet, saute the apple slices in small amount of butter (about 10 minutes- stir occasionally if julienne style, or turn over half way through if using thin slices.
  5. Preheat oven to 375*
  6. Spread flour over flat surface, then lay pastry puff out.  Roll it out to make it thinner.
  7. Use a pastry brush to brush light layer of oil over the pastry.
  8. Slice the pastry into 16 square with a pizza cutter, then slice each square in half diagonally to make triangles.
  9. Lightly oil baking sheet, then place the triangles on the sheet, not touching.
  10. Place a potato or apple (or both, if you like) onto the triangles.
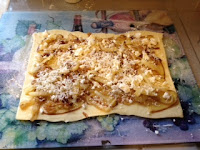
  11. Sprinkle Feta over potato/apple, then top with the caramelized onions.
  12. Sprinkle Parmesan over the top.
  13. Bake for 15 to 20 minutes (puffed and golden).  Serve hot!


Step 3

Step 4


Step 6
Step10


Step 10 & 11
Done!!


The pictures from today show that I made the whole tart and then sliced it before putting on to the baking sheet. This was not as easy to do as I thought because the dough got too soft. I suggest making them individually, if you have the time.  Also, my picture shows the apples sliced julienne style.

Another option, (I did this for the shower, too), use a pastry crust (frozen, flat pie crust), place it onto a round baking stone, assemble as listed above, cook, and slice with pizza cutter once it's cooked.

Zereshk Polo

This is an amazing Persian Dish!  But DO NOT think for a moment that I think I am a pro at making Persian food! Cooking Persian food is an art that I am slowly learning, and practice makes perfect... I have yet to master the Tah-Dig (crunchy rice), but I continue to try!  I've made this dish several times and everyone has loved it so far!  So, I've decided to share it here.  (Today was the first day that I used barbarries... I usually use dried cranberries. They are REALLY TART!!  It's good, but I think I will stick with the cranberries!)

Zoreshk Polo!

Ingredients:
  • 2 cups basmati rice
  • 2 oz salt
  • 1 medium onion, thinly sliced
  • 1 skinless chicken breast (with bone is way juicier!)
  • 1/8 tsp black pepper
  • 1/4 cup butter
  • 1/2 cup of barberries, or dried cranberries
  • 1/4 cup sugar
  • 1/8 tsp powdered saffron
  • 2 tbls olive oil
Directions:
  1. Rinse rice several times, then soak in warm water with 2 oz of salt for several hours.  Drain.
  2. Heat 2 tbls of oil in large skillet. Add onion and caramelize.
  3. Add chicken, 1/4 cup of water, 1/4 tsp salt, and 1/8 tsp pepper. Cover and simmer over low heat for about 45 minutes until cooked through.
  4. Remove from heat. 
  5. When slightly cooled, shred chicken with two forks and return to the pan (and it's juices). Cover to keep warm.
  6. In large (8 qt) pot, bring 4 cups of water to a boil.  Add rice and cook for 8 to 10 minutes until slightly soft. Drain in colander.
  7. Meanwhile, rinse barbarries thoroughly. 
  8. Take a pinch of saffron and put into a Mortar & Pestle to grind into fine powder.
  9. Melt butter in small pot, add barberries, saute for 1 minute.
  10. Add sugar and saute for 1 minute more.
  11. Dilute saffron in 1/4 cup hot water and stir into barberries.
  12. In the large pot used to cook rice, heat 2 tbls of olive oil.
  13. Add rice, using a large spoon and fluffing rice. Then pour barberry mixture over rice. (If using potatoes, lay them on the bottom of the pot BEFORE you add the rice!)
  14. Cover pot and cook over low heat for about 30 minutes. For crisp, golden layer on bottom of rice (called tah-dig), cook for 15 more minutes. (I usually fold a paper towel and lay it over the top of the pot before placing the lid on. It helps with some of the moisture.)
  15. Gently mix the rice and the drained shredded chicken, then spoon onto a serving platter.
ENJOY!!!
Step 3
Step 6

Step 8 (before)
Step 8 (after)
step 9
Step 10

Step 11
Today, I used sliced potatoes at the bottom of the rice before I cooked it.  The potatoes come out crunchy, and help keep the rice from burning!  Traditional Tah-dig is simply having the rice at the bottom of the pan get crispy.  I've always been afraid of burning it, so it's never been as crispy as I want.  Today's potatoes turned out great!!

Zoreshk Polo with Tah-Dig (of potato)